I’m learning. And as I learn, I’m hoping to share what I learn. These are the tools and techniques and other little arty technical thingies that I’m playing with at the moment. I hope they are useful.
-o-o-o-
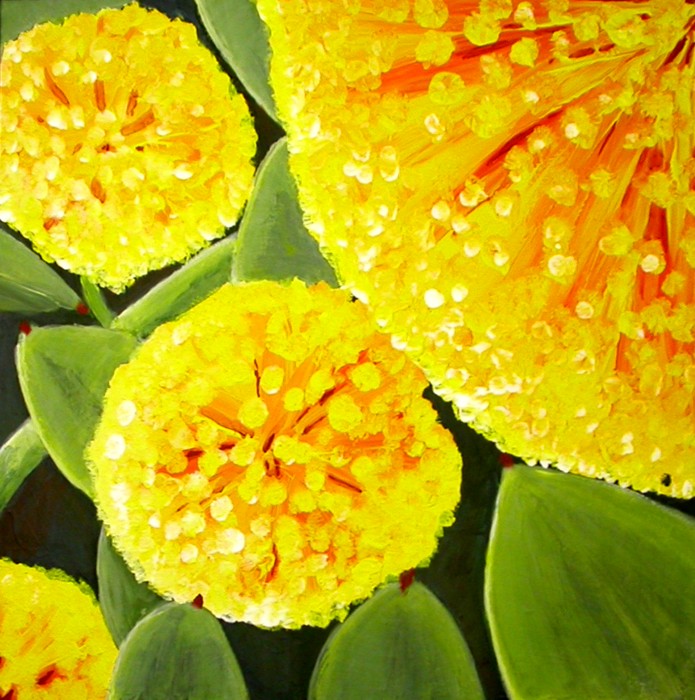
I finished my Wreath Wattle painting today. Hubby was kind enough to take the kids for a while and I splatted paint onto board to finish it.

Wreath Wattle, acrylic on board, approx. 300 x 300 mm.
-o-o-o-
It is pretty slapdash, but I like the colours in it. The design I originally had in mind was for a much larger piece of board/canvas, but I didn’t have any at the time. I do now, so I might do another similar, though not the same (because that would be boring :D).
I tried a new technique with the leaves. I’ve been drawing various flowers for years, but I’ve never really been good with leaves. I think I’m a little impatient with them after all the fun of the flowers, they seem a little mundane to paint. But this time, being aware of this, I tried to spend more time with them and get them working well. I don’t think I was fully successful, but I did try something new with them.
I painted them in, as you can see in the work-in-progress shot from a couple of days ago. I wasn’t happy with their colour and form, but instead of painting over them repeatedly trying to build the right colour, I let them dry and painted thin washes/glazes over them, first to lighten and secondly to give them a more yellow green (this is not a very good photo of the work at all). This enabled me to build up their shape with the thick acrylic I love to use, then add light and depth with the glazes. Here is a close up of one of the leaves and you can see how the light washes add depth.
While the glaze was still wet, I wiped it with a rag to thin it and give it texture, which I used to vaguely give the impression of leaf veinage. You can see the glazing above as the light and thin lines going right to left.
I only just barely touched the surface of this technique and I’m certainly going to explore it further.
-o-o-o-
How I did it
Lay down some thick acrylic and create the painting form complete with shadow and light. You may want to make it darker or lighter than the final result you are looking for depending on whether you would like to add light or dark glazing. Let it dry.
Thin some paint of the colour you would like to glaze with either with water or the appropriate thinning acrylic medium (I think it is recommended to use a proper medium for glazing as too much water added to acrylic paint can weaken the dried paint). I used water because I had no medium. Make it really thin. Apply it over the painted form with a brush.
Watch out for thin paint running down a vertical surface if you are using an easel like I was 😀
Wipe over the glaze carefully with a lint-free cloth, making sure that you take note of the marks left by the cloth so that you can wipe in the direction most suited to your composition.
Let the glaze dry.
Repeat the procedure as many times as you need to, building up the painting. I managed it four or five times because I wasn’t happy with the colour. I think the more times you do it, the more depth you will add to your work. Ultimately do what the painting requires.
And here is a great demo. I did basically the same thing, except used water and rubbed the glaze with a cloth before it dried.
Nutty
(whose name will be changing in the near future)


Comments
6 responses to “Tools and Techniques – acrylic glazing”
I LOVE it! They pop right off the page. The colors are intense and bright and you have achieved depth. Thanks for sharing the video, I am not a painter and have wondered what glazes were for. I think they could be used over my collage though. I may give it a whirl one day, if I ever quit working 3D.
[…] you believe that this is a derivative of the one piece of art I did finish this week (blogged here)? It is in fact what the piece below was initially meant to be, but it went in a different […]
[…] brushstrokes, I’m considering exploring this medium much more. I think my little discovery of glazing the other day has helped me a lot. I’m still very heavy handed, though, so I may stuff it all […]
love your painting – thanks for sharing the info on how to!!!
dana
[…] also done some more experimenting with the glazing effect I discovered in my last painting and I’m finding it really useful. If I glaze repeatedly, it gives that extra bit of depth to […]
[…] by wetting the dried paint with a brush and then blotting with tissue. When I experimented with acrylic glazing, I wiped the glaze with a cloth before it could dry properly to give it texture. I pondered if I […]