
We had a fabulous workshop today, running through the basics of hand-carving your own stamp. For those who missed it or simply would prefer more information on how to hand carve, here are the notes I wrote up for this Exploration.
Why stamps?
Because they are fun. Because they give you the opportunity to shortcut and repeat art. Because they give a control over your work with the mediums you use that you can’t quite get from a computer or photocopier. But, yeah, mainly because they are fun.
What you might need
Design – what stamp are you going to make? The design of the stamp is the factor that directs everything to follow. You can draw on a piece of paper or use a computer or photocopier to give you a nice outline to trace down.
Cutters – you will need some kind of implement to cut into the rubber stamp material. Lino cutters are the usual choice. These come in two cutting types – V and U. V and U shaped cutters come in different sizes depending on what kind of mark you would like to make with your cut. The cutters also come in two different handle types. The first and original is one cutting blade, one handle – you buy a set of cutters, usually with wooden handles. The second is one handle, multiple blades that can be changed depending on what cut you would like to make.
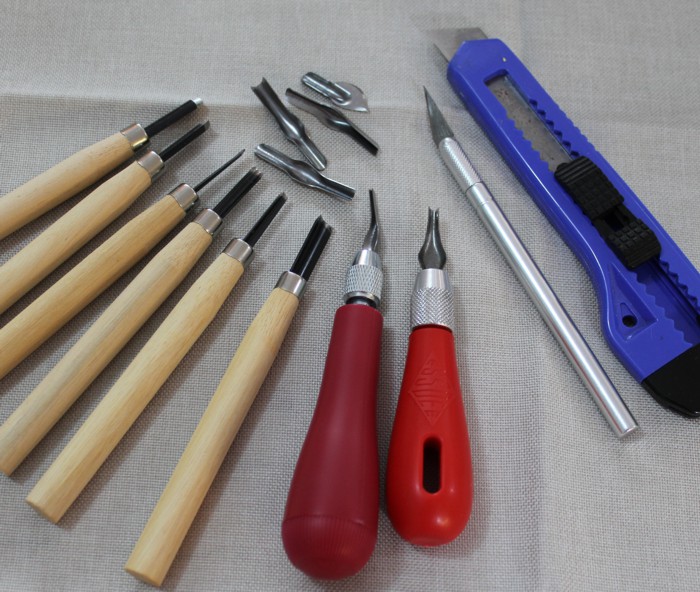

I like to use an interchangeable handle cutter for the fine lines as I find that the fine blade provided is thinner and makes smaller cuts than the tools with individual handles. However this might be dependent on how much money you can throw at your tools – my main cutter is at a medium to minor price point, I have no doubt that research and more money would provide better tools.
Utility and hobby knives – these are very handy to have around. The utility knife is very useful for cutting up rubber blocks. The hobby knife (scalpel) can be used to help with carving in tiny and hard to reach places. Scissors are also good to have around for cutting up designs.
Carving blocks – The surface (plate) you carve into to create a stamp can be anything from a potato to lino to wooden blocks. It depends on what you would like explore. For this specific exploration, I have focussed on the easy-carve rubber blocks. Around one centimetre in thickness, the blocks cut easier than lino and give a good print without the use of a lino press, yet can be worked to the level of a large print. Often because the material is so thick, a stamp can be made on both sides of the block. I tend not to do this, but it is possible.
Ink/paint – You can use a variety of media to stamp with, each of them having their positives and negatives and methods of application. Ink pads are a great place to start. Make sure you buy good quality ink or inkpads and make sure you know what type of ink it is – I recommend water-based pigment inks. Keep an eye out for words like ‘acid free’ and ‘archival’ as these are good things to have. Be aware that the quality of your work can be affected by the quality of your ingredients.
A quick note on acrylic paints – You can use acrylic paints with stamping and get some fantastic results, you just need to keep in mind a couple of important factors:
- Paint viscosity – how thick is the paint? Experiment with different paint thicknesses. Each will leave its own mark on the result.
- Retarder – you may need to add retarder to the paint to slow its drying time. The paint can dry so fast that you stick your stamp to the paper/card. Work fast and be aware.
- Cleaning your stamps – acrylics can build up in the fine areas of your stamp, make sure you clean your stamp immediately after using acrylics.
Ink or paint applicator – basically there are two main methods of applying ink or paint to your stamp. Traditional lino printing requires a brayer or roller to roll ink onto the printing surface. You can do this, explore it, but for this exploration I am focussing on sponge application. Ink pads are the easiest way to do this and can be bought in many different colours. If you are using high flow acrylics or ink, fine rubber cosmetic sponges can do a great job. Many different textures can be achieved depending on how the ink/paint is applied.
Something to stamp on – I prefer blender card, card specifically designed for marker illustration, but you can use anything you like from photocopier paper through to canvas, rock and with the right ingredients, fabric. Keep in mind that what you stamp on will have an effect on your outcome. Experiment always before embarking on a final project.
Pencil, paper, sharpener and eraser – to help you create your design and get it onto the rubber block. A computer is a wonderful optional accessory that can open all sorts of design possibilities as well.
Cutting mat and table protector – never forget to protect your furniture or it will never let you forget you didn’t.
Small water spray bottle and cloth wipe – use these to keep your stamps clean.
Good lighting – Being able to see what you are doing while carving is a must.
What you might do
The design
Everything starts with a design. Some things to consider:
- What do you want to show or say?
Make sure your design communicates what you want it to say. - What will you be using it for?
Is it a logo, a picture, text? – what you use it for will have an impact on its size, readability and the materials you make it from. A logo, for example will need to be readable at all sizes and you likely wouldn’t want to carve it out of a potato. Some pictures might require fine detail, so you might want to consider what you would like to carve the plate from – rubber, lino, wood or even metal. - What do you want to print it on?
Different surfaces may require different inks or paints or mediums to be added to make sure the print ‘sticks’ to the surface. Some surfaces won’t take intricate detail. - What ink or paint will you be using to print it with?
Different media give different results. - What size did you want it?
How much rubber do you have? Will rubber handle that size or detail? - Will you be able to re-use it?
Is it of a size you can re-use multiple times? - Can it be adapted for a mono-print or will it need multiple pieces?
Stamping, because of the method used, will only print a one colour image. This image has positive and negative areas – where there is ink and where there is no ink – black and white. Your design can be created multiple ways:- Simple one stamp, one colour print
- One stamp, but ink or paint applied in a way to create multiple colours
- One stamp used multiple times to create the final image – different colours optional.
- More than one different stamp – break the design up into different colours or shapes and create a separate stamp for each colour or shape, whether they be stamped over each other or beside each other.
- One stamp, but used in a mono-print (only one print ever) by stamping the first print, then carving more areas out of the stamp before stamping over the print again to create different colour areas. More carving can be done at whatever number or prints needed, but the process cannot be repeated as the stamp has been altered beyond recovery.
- The stamp can be a single colour, but other media can be applied over the top for colour and detail.
Will your design work in one colour and the surface colour? Or will there need to be multiple stamps made to create a multiple colour work?
An example of a one colour design

An example of a two stamp, two colour design

One stamp, multiple uses.

Each of these should be at least thought about before even starting a design. Exploring the whole stamping process first and experimenting with different everything will give you the experience to answer many of the questions above if you are embarking on a purposeful design.
If you are just starting out, start with some basic shapes to give you a feel for the materials you will be working with. And don’t forget to have some fun.
Transferring your design
- Draw your design on a piece of paper or print it out.
- Using scissors, cut roughly, in a circle around the design so you have a piece of paper roughly the size of the stamp you are going to create.
- With a 2B or softer pencil, trace over the outline of your design. Make sure the pencil goes around the edges of the sections of the design you want to print. See red line below – the black sections are the parts we want to print.


- Grab a piece of ezy-carve rubber slightly larger than the design and inspect it for any imperfections before you start – nothing like carving a stamp only to find the printing surface is marred by a pit you missed.
- Turn the design facedown/pencil-side down on the piece of rubber. Using a rounded object like the back of a spoon or a burnishing tool, rub firmly across the back of the design enough to let the pencil print onto the rubber. You can hold the paper still with one hand and burnish with the other.
- Once the pencil is transferred, you can gently draw on the rubber with a 2b or softer pencil to firm up the lines.

Carving the stamp
- Select the finest V shape cutter and gently, cutting away from your body and avoiding your hands, cut the outline of the portions of rubber you would like to remove.
Things to keep in mind:- Cut from your shoulder and elbow, do not turn the cutter with your wrist – this will give you smoother lines.
- When cutting curves, move the rubber, not the cutter. Spin the rubber as often as you need.
- Cut gently and shallowly. The rubber is soft, it does not need much pressure to cut. The harder you press, the more likely you are going to slip and either make a mistake or accidently carve yourself.
- Always try to end a cut in an area that is going to be removed. This way there is less chance of the printing plate being damaged by accident as the blade surfaces. If you are cutting into a T-intersection, try to do the top of the T before the stem so that the stem has the width of the top of the T as a buffer if you are cutting from the bottom up.
- Start in tight corners and cut outwards. You have more control of the blade as it goes into the rubber than you do as it comes out.
- Once the outline is completed, you can switch blades to a small U blade and start removing the sections you don’t want to print. Be careful, this is where most damage is likely. Switch between the blades as much as you need to. Work calmly and methodically, this is definitely one of those crafts where haste makes waste. If you do make a mistake, there is always the opportunity to alter the design or work around it, depending on the ultimate purpose you are creating it for. I’ve certainly made enough mistakes, but many of them have led to new designs, so mistakes aren’t all bad.
- Once you have removed all the rubber in the negative space, use a utility knife to cut any excess rubber around the design.

- Test your stamp – ink it up by dabbing the stamp pad evenly over the surface until all the printing surface is inked and gently print it onto paper (lay the stamp print side down on the paper and burnish gently with your hand for a moment or two, before slowly lifting the stamp off). Any missed spots will show up clearly. Clean the stamp with a water spray bottle and wipe.
- Study the test print thoroughly and circle any defects that are showing. Keeping in mind that the print is a mirror of the stamp, carve to correct what is needed. Test print again and carve again until you are happy with the print result.
What to do next
Whatever you want! Go stamp crazy.
Some ideas:
- Stamp onto pre-made greeting cards or gift tags.
- Repeat the stamp to make a recurring motif for wrapping paper.
- Use fabric ink or paint to print onto fabric – cushion covers are a popular surface.
- Use different colours, mediums and materials to get different effects with the same stamp.
- Paint over the print and create new final artworks (one of my favourites).
- Embossing powders – these powders can be added to the stamped print to make a raised area – available at your local art and craft store.
- Some people stamp on rocks and terracotta plant pots.
Experiment, explore, discover new ways to create art, and new art pieces in the process.


For South Australian artists who would like supplies for this exploration:
Lino cutters, stamp rubber, blender card and blank greeting cards (and a full range of Golden Paints, both Fluid and High Flow, and the Montana Markers I use my High Flows with) can all be found at Art to Art – both Glen Osmond Road and Harbourtown.
Stamp pads – Versa Color – can be purchased online at Regal Craft Cards (and lots of different cards and envelopes)
You can also get the stamp pads at Spotlight (though more expensive) and blank cards at Neds.
For everyone – my favourite stamper and one of my favourite artists is Geninne Zlatikis. Check out her gorgeous work and I recommend purchasing her book ‘Making an Impression‘.
And here are some templates you can download and use to build your own stamps. The geometric shapes are designed to be drawn over to create the shapes you are looking for – Templates for stamps (687 Kb)
For further explorations and ventures into art, please have a wander around this website. You can find more of my Explorations here, but there are plenty of Experiments along the way. If you are interested in a particular media, there is a list of media I have played with alongside my blog on the right side of the screen.
Any queries about the above Exploration, you are welcome to contact me.
Art Always!
Best wishes,
Liz
PS: This is my late submission to Paint Party Friday, so don’t forget to go visit and see all the wonderful artwork happening over there 😀
Comments
5 responses to “Exploration – Handcarved stamps”
Wow wonderful post.
Yeah, a bit heavy on this week with a full-on tutorial 😀 Thanks so much for dropping by and commenting 😀
Best wishes,
Liz
I really love this post! I actually carved some of my own stamps years ago and used them in a scrapbook. Nothing as detailed as yours…will have to give it a try again. I loved your monarch butterfly (watercolor over the stamped outline) idea so much I told Mom to be sure to look at your post before. Really great, detailed info. Thanks so much!
Thankyou so much, Marie 😀 This is why I write my explorations – in the hope they will inspire someone to give it a go 😀 Once you have started exploring, you never know where it will take you.
The butterfly uses acrylic paints to paint over, but you could use watercolours. It would be interesting to experiment 😀
If you do have a go, I’d love to see what you create. Thanks so much for dropping by and for your kind comments 😀 I hope you have fun.
Art Always!
Best wishes,
Liz
LOVE that works , wonderful
Have nice Day and Happy PPF
Elke